1. Introduction to Radon Mitigation
Radon is a naturally occurring radioactive gas that forms from the decay of uranium in the soil, rock, and water. It is colourless, odourless, and tasteless, making it difficult to detect without proper testing. Radon becomes a health concern when it accumulates to high levels in homes and buildings, as prolonged exposure can lead to lung cancer. Understanding and implementing radon mitigation strategies is crucial for safeguarding the health of you and your family.
1.1 What is Radon?
Radon is a radioactive gas that originates from the breakdown of uranium in the earth. It can seep into homes through cracks in the foundation, walls, and other openings. Once inside, radon can accumulate to dangerous levels, especially in well-sealed or poorly-ventilated homes.
1.2 Why is Radon Dangerous?
The primary risk of radon exposure is an increased chance of developing lung cancer. According to the Environmental Protection Agency (EPA), radon is the second leading cause of lung cancer in the United States, responsible for approximately 21,000 deaths annually. This risk is particularly high for smokers, as the combination of smoking and radon exposure significantly elevates the likelihood of developing the disease.
2. Understanding Radon Mitigation
Mitigation refers to the methods used to reduce radon concentrations in buildings. These methods are designed to prevent radon from entering your home or to reduce its levels if it is already present. Effective mitigation can significantly lower the risk of radon-related health issues.
2.1 What is Radon Mitigation?
Mitigation involves a series of techniques aimed at reducing radon gas levels in a home or building. This process typically includes testing to identify radon levels and implementing one or more mitigation methods to reduce these levels to below the EPA’s recommended action level of 4 picocuries per litre (pCi/L).
2.2 How Does Radon Enter Homes?
Radon can enter homes through various pathways, including:
- Cracks in the foundation.
- Gaps around service pipes.
- Construction joints.
- Spaces in suspended floors.
- Cavities inside walls. Understanding these entry points is essential for effective mitigation.
3. Radon Testing: The First Step
Before any mitigation efforts can begin, it is crucial to test your home for radon. Testing provides the data needed to determine whether mitigation is necessary.
3.1 When Should You Test for Radon?
You should test for radon if:
- You’ve never tested your home before.
- You’re buying or selling a home.
- Your home is located in an area with high radon levels.
- You’ve recently renovated your home or made changes to its structure.
3.2 Types of Radon Tests
There are two primary types of radon tests:
- Short-Term Tests: Last from 2 to 90 days and provide a quick snapshot of radon levels.
- Long-Term Tests: Last for more than 90 days and give a more accurate picture of average radon levels over time.
3.3 Interpreting Radon Test Results
If your test shows radon levels of 4 pCi/L or higher, the EPA recommends taking action to reduce these levels. Even if the levels are below this threshold, you may still want to consider mitigation, especially if levels are close to 4 pCi/L.
4. Mitigation Techniques
There are several effective radon mitigation techniques available. The choice of method depends on the design of your home and the radon levels detected.
4.1 Active Soil Depressurization (ASD)
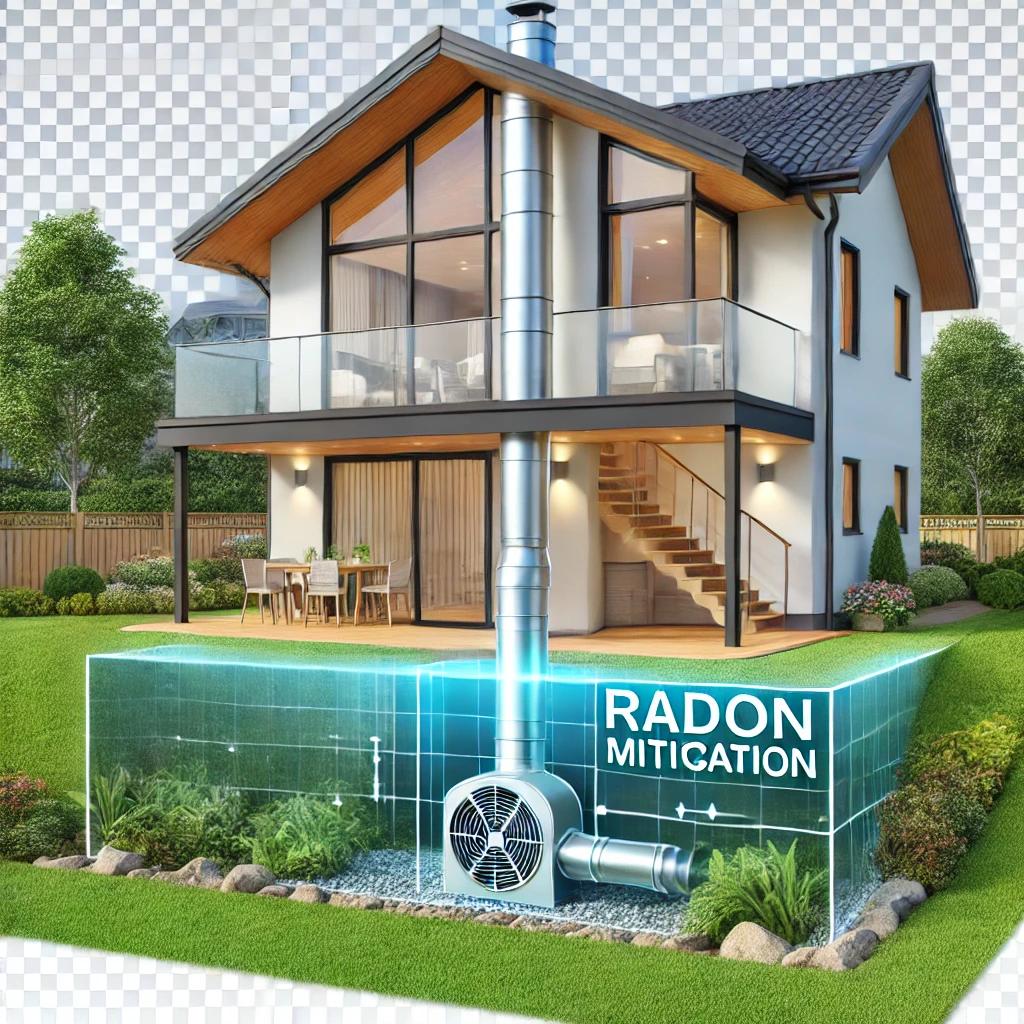
ASD is the most common and effective radon mitigation technique. It involves installing a pipe system that draws radon gas from beneath the foundation and vents it safely outside. A fan is typically used to create negative pressure, preventing radon from entering the home.
4.2 Sub-Membrane Depressurization
This method is used in homes with crawl spaces. A plastic sheet is placed over the soil in the crawl space, and a vent pipe and fan system are used to draw the radon from under the sheet and vent it outside.
4.3 Sealing Cracks and Openings
Sealing cracks and openings in the foundation and walls can help reduce radon levels by limiting the pathways through which radon enters the home. While sealing alone is not a complete solution, it is an important part of a comprehensive mitigation strategy.
4.4 Ventilation Improvements
Improving the ventilation in your home can help reduce radon levels by diluting the concentration of radon gas indoors. This can be achieved by installing or improving existing ventilation systems, particularly in basements and crawl spaces.
4.5 Other Mitigation Methods
Additional methods, such as pressurization and heat recovery ventilation (HRV), can also be used to reduce radon levels. These methods are typically used in conjunction with other mitigation techniques.
5. Choosing a Professional Radon Mitigation Service
Selecting a qualified professional is essential for effective radon mitigation.
5.1 What to Look for in a Radon Mitigation Contractor
When choosing a mitigation contractor, consider the following:
- Certification and experience in radon mitigation.
- Knowledge of local building codes and regulations.
- Willingness to provide references and proof of previous work.
5.2 Questions to Ask Before Hiring
Before hiring a contractor, ask:
- What is your experience with radon mitigation?
- Can you provide a detailed cost estimate?
- What type of warranty do you offer on your work?
5.3 Cost of Radon Mitigation
The cost of mitigation can vary depending on the size and design of your home and the method used. On average, homeowners can expect to spend between $1,500 and $3,500 on mitigation, but costs can be higher for more complex systems.
6. DIY vs. Professional Radon Mitigation
6.1 When DIY Mitigation is Feasible
DIY mitigation may be suitable for smaller projects, such as sealing cracks and improving ventilation. Homeowners can purchase radon mitigation kits, but these are often less effective than professional systems.
6.2 Risks of DIY Radon Mitigation
Improper installation or incomplete mitigation can lead to persistent high radon levels. For comprehensive mitigation, hiring a professional is recommended.
7. Maintaining Radon Levels Post-Mitigation
7.1 Regular Testing and Monitoring
Even after mitigation, it’s important to regularly test your home to ensure radon levels remain low. Testing should be done at least every two years.
7.2 System Maintenance Tips
- Check the mitigation system’s fan regularly to ensure it is functioning correctly.
- Seal any new cracks or openings in the foundation as they appear.
- Replace any damaged components of the system as needed.
8. Mitigation Myths Debunked
8.1 Myth: Radon Mitigation is Too Expensive
While the initial cost of mitigation may seem high, it is a small price to pay for the health benefits it provides. Additionally, many states offer financial assistance or tax incentives for mitigation.
8.2 Myth: New Homes Don’t Need Mitigation
Radon can affect homes of any age. New homes, especially those built on radon-prone soil, can still experience high radon levels and should be tested and mitigated if necessary.
8.3 Myth: Mitigation Systems Are Unreliable
When properly installed and maintained, radon mitigation systems are highly effective at reducing radon levels. Regular maintenance and monitoring ensure they continue to function as intended.
9. Conclusion: Protect Your Home and Health
Radon is a serious health risk, but with proper testing and mitigation, you can protect your family and home. Take the first step by testing your home for radon, and if necessary, implement one of the many available mitigation techniques. Remember, a radon-free home is a healthier home.
10. Frequently Asked Questions (FAQ)
10.1 What is a safe level of radon in homes?
The EPA recommends taking action if radon levels are at or above 4 pCi/L. However, no level of radon is completely safe, and lower levels still pose some risk.
10.2 How long does radon mitigation take?
Most mitigation systems can be installed in one day, with some more complex systems taking longer.
10.3 Can I sell my home if it has high radon levels?
Yes, but it’s important to disclose the radon levels to potential buyers. Mitigating the radon before selling can make your home more attractive to buyers.
5 Actionable Tips for Effective Radon Mitigation
- Test Your Home Regularly: Conduct a radon test at least once every two years, or more frequently if you’ve made significant changes to your home’s structure or ventilation system.
- Seal Cracks and Openings: Regularly inspect your home for new cracks or gaps in the foundation and walls. Seal them promptly to minimize radon entry.
- Install an Active Soil Depressurization System: This is the most effective mitigation technique for most homes. It involves installing a vent pipe system and a fan to draw radon from beneath the house and vent it outside.
- Improve Ventilation: Increase airflow in your basement and other enclosed spaces to help dilute radon levels. Installing ventilation fans or using existing HVAC systems can be effective.
- Hire a Certified Professional: For the best results, hire a certified radon mitigation contractor who is experienced and knowledgeable about local building codes and regulations. This ensures the system is installed correctly and effectively


